Before you download one of the IPVanish apps to your device, you need to subscribe to one of their service plans. This is a very simple process. First choose your VPN plan. The second step of this process lets you enter an email address and password for your account.

Once you have created your account, you need to choose a payment method and enter the appropriate information to complete your purchase. The IPVanish staff will send you a welcoming email once your account is active. The process is automatically completed behind the scenes so you can expect to receive the email immediately after signing up.
Downloading IPVanish Custom Apps
Once your account is active you can download the appropriate IPVanish software for your device and install it. To begin this process, select “Apps” from their website main menu. Scroll down and select the icon for your desired OS.
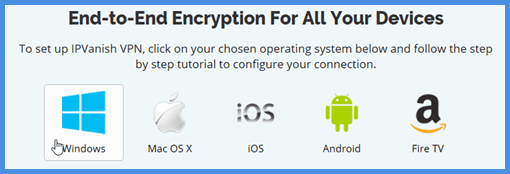
This will open a page where you can click on the “Download” button to download the installation file to your Windows or Mac OS X computer. Clicking on the links to iOS, Android, and Fire TV will take you to the appropriate store (iTunes, Google Play, Amazon) where you can then finish the installation process to your device.
Installing and Using the IPVanish Windows Client
Installing the IPVanish Windows Client
Once you have downloaded the Windows installation file for the IPVanish client, run it as administrator and allow it to make changes if necessary. First, you will see a welcoming screen. Select next and then accept the Terms of Service. You must accept these for the installation process to continue.
 Click next through the screen to accept the default directory. Now that the initial setup is completed, click install to finish the transfer of the client to your PC. When this completes, you will see the startup screen to run the client for the first time. Click “Run IPVanish” and the login screen will open.
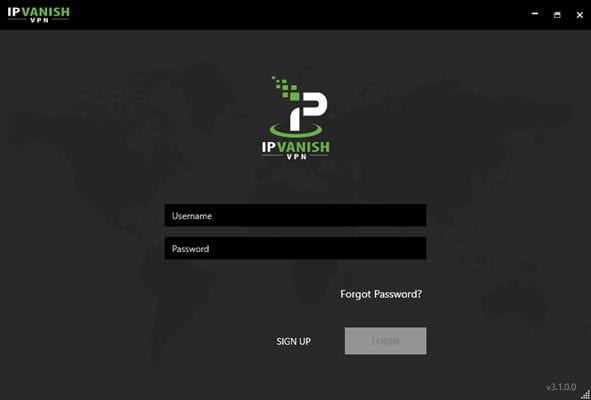
Enter the email address and password that you used to created your IPVanish account. After your credentials are verified, the client dashboard will open.
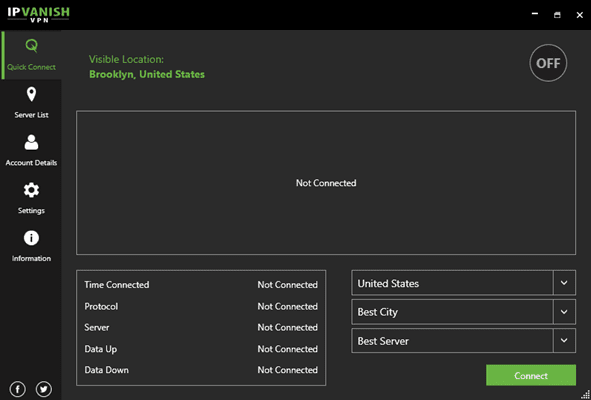
IF you were to connect now, the software would automatically connect you to the best server from your location based on the ping and server load of the closest server locations.
IPVanish Windows Client Menu
However, before you do this let us first examine the menu of screens shown on the left-hand side of the main dashboard. The menu is divided into five categories:
- Quick connect – this screen can be used to make and monitor quick connections to the the VPN network.
- Server list – screens which provide alternate server connection lists and filters to connect to the service. (We will examine the server list and quick connect screen in greater detail later in our IPVanish review.)
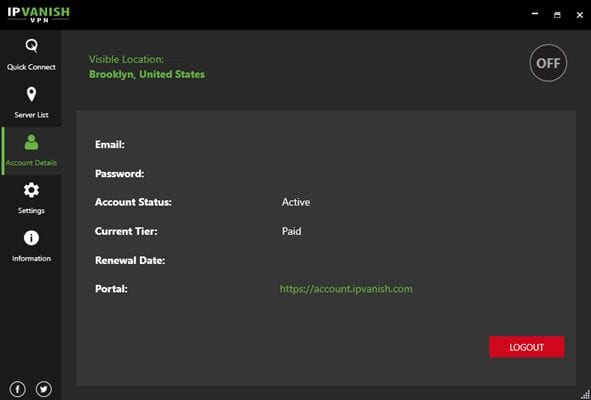
- Account Details – is a screen which displays your account information and a link to the account login portal on their website.
- Settings – allows you to control general and connection settings for the client. (we will look at these screens in greater detail in the next section)
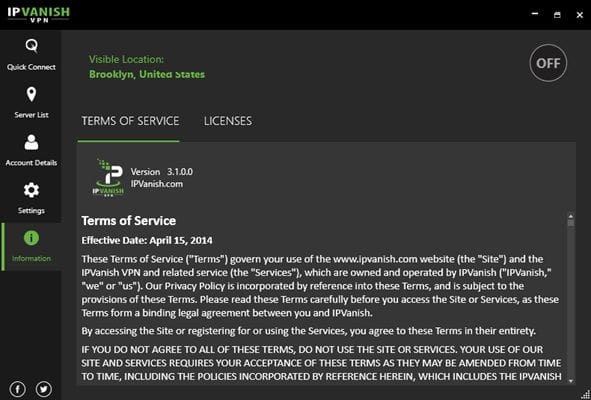
- Information – displays the version info, TOS, and 3rd-party licenses associated with the IPVanish software.
IPVanish Settings Menu
The settings menu allows you to change the appearance, startup, and connection behavior of the IPVanish Windows client. It is divided into four tabs: General, Connection, IP settings, and Logs.
General Settings
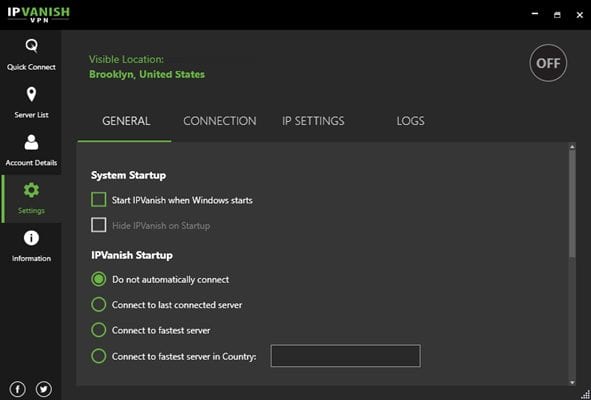
These general settings are divided into five categories. These are startup, closing, update, support, and interface.
- System startup – controls client startup behavior once system is started.
- Start IPVanish when Windows starts – this will automatically start the IPVanish client when Windows is opened and allow you to shrink it.
- Hide IPVanish on startup – Shrink the client to the system tray once it opens.
- Start IPVanish when Windows starts – this will automatically start the IPVanish client when Windows is opened and allow you to shrink it.
- IPVanish startup – a toggle that lets you choose if and where the IPVanish app connects to on startup
- Do not automatically connect – wait to connect manually.
- Connect to last connected server – automatically connect to last successful location.
- Connect to fastest server – choose the fastest server determined by the software.
- Use fastest server in country – select a country to automatically connect to.
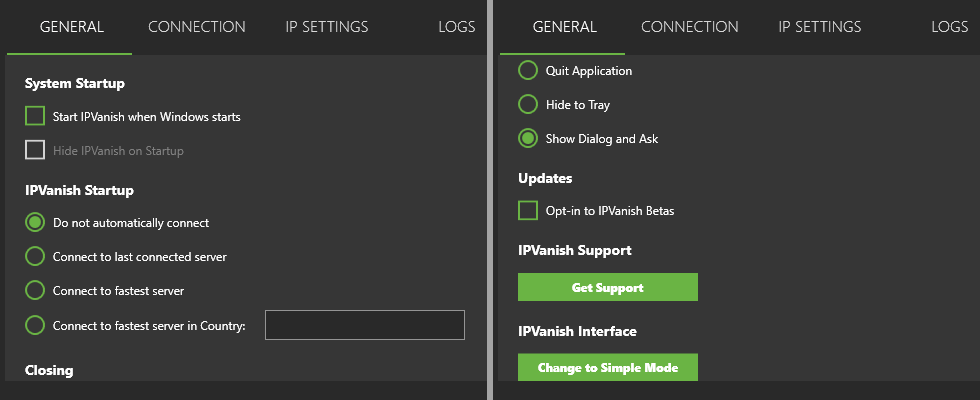
- Closing – choose how the software behaves when you close it using the Windows close icon.
- Quit application – disconnect from the IPVanish service and close the app.
- Hide to tray – shrink the app to the system tray. You can then control it from there.
- Show dialog and ask – prompt for directions on closing on a case by case basis. We recommend this setting because we like being able to change this based on what we are doing at the time.

- Updates – choose if you want to participate in beta testing. Remember betas can sometimes affect the stability of the client.
- IPVanish interface – switch to the simple interface mode for easy use or to free up desktop space.
Connection Settings
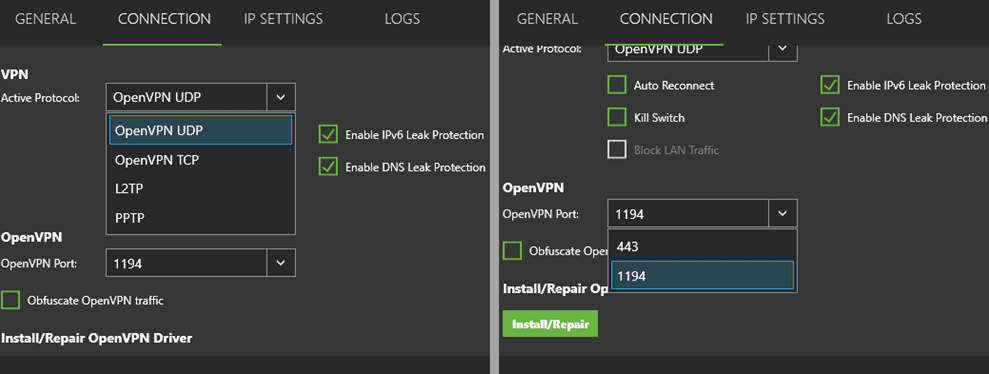
The connection settings for the Windows client are divided into three categories. They are VPN, OpenVPN, an Install/repair OpenVPN driver.
- VPN –
- Active protocol – their are four protocol choices.
- OpenVPN UDP – the client’s default protocol. It is the fastest and most secure protocol and should be used as your first choice.
- OpenVPN TCP – this protocol does error checking and is thus more stable but slower. It can be used for long distances or weak connections if the OpenVPN UDP protocol exhibits stability issues like frequent disconnects.
- L2TP – an alternate VPN protocol that uses double encryption and secures your data using IPsec. It should be used if OpenVPN does not work.
- PPTP – the least secure VPN protocol which should only be used if the others fail.
- Auto reconnect – setting this, auto-start on system startup, auto-connect, and the kill switch will help ensure that you are always connected when you are on the Internet
- Kill switch – activating this switch will disable your internet access if the IPVanish connection is accidentally dropped to help guard your online privacy and anonymity.
- Block LAN traffic – if the kill switch is active, you can still receive LAN traffic between shared resources.
- Enable IPv6 leak protection – protects against IPv6 leaks while using the VPN.
- Enable DNS leak protection – protects against DNS leaks from other programs.
- Active protocol – their are four protocol choices.
- OpenVPN
- OpenVPN port
- 443 – the port used by SSL websites (HTTPS). This is a good option for those who want to disguise their traffic using the same port as your bank and other companies use to secure their websites.
- 1194 – the default OpenVPN port.
- Obfuscate OpenVPN – used to help overcome deep packet inspection by using scrambling, obfuscating data packets and ports used.
- OpenVPN port
- Install/repair OpenVPN driver – this will allow you to repair a corrupted TAP driver without needing to reinstall IPVanish.
IP Connection Settings
There are three categories for the IP settings screen. They are as follows: Change IP address, Verify IP address, and DNS configuration.
- Periodic IP address change – will let you change your IP address periodically during a single session. The minimum period that you can choose is 45 minutes. Other choices are 60 and 90 minutes. This can help protect your privacy but you should be aware that you may be exposed during the IP exchange process so should stop other running programs during this transition or enable the VPN kill switch.
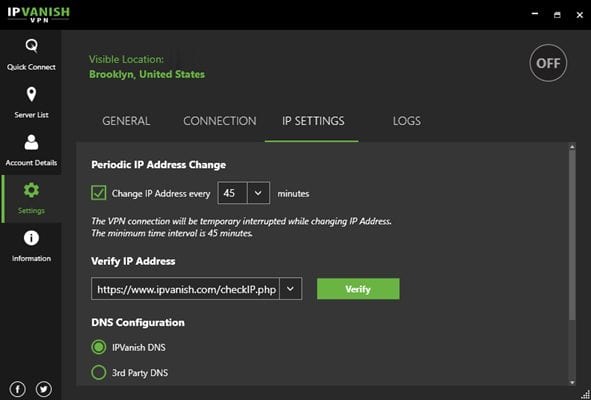
- Verify IP address – is a variety of website links to verify your IP address. This will le you check your current IP address. You will notice the IP address and location will change when you connect to the IPVanish network.
- DNS configuration – will by default let you choose to use the IPVanish DNS for queries. Else you can enter your own 3rd party DNS like OpenDNS or Google by entering the primary and secondary DNS servers. We recommend using the IPVanish DNS option for privacy.
Connection Logs
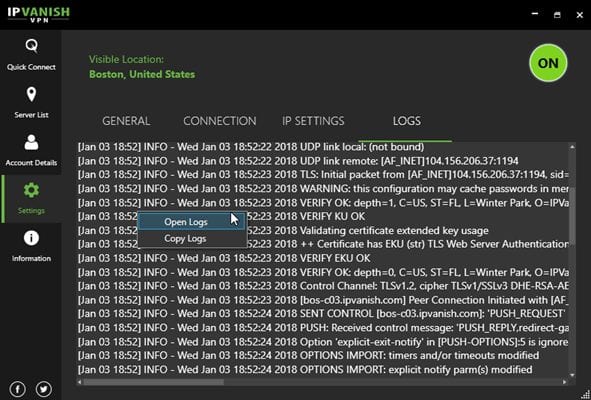
This screen displays the connection logs for your current session. Right-clicking on it opens a menu that will let you open the log in notepad. Else you can copy it to the clipboard and paste it into an email or other application. This can help when contacting the IPVanish support staff regarding connection problems.
Using the IPVanish Client
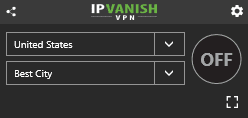
You can connect to the IPVanish service with the regular or simple interface. You can open the simple mode by selecting it in the “General settings” menu.
The Simple Interface Mode

- Network icon – clicking on the network icon (dotted triangle) displays links to the IPVanish Facebook and Twitter pages.
- Connection process – clicking the “Off” button will start the connection to the fastest city (based on ping and load percentage) from your location.
- Connected dashboard – Once this connection completes it will display your virtual location, IP address, and the current session duration. The “On” button will turn bright green.
- Disconnecting – clicking the “On” button will disconnect you from your current VPN server. The last connected location will be displayed.
- Select country – this will let you select the country that you want to connect to. This is useful for expanding your entertainment choices, viewing real-time sporting events, or saving money on regionally priced services. Choosing a new country will reset the city to “Best city”.
- Select city – you can select the city in your chosen country to connect to from here. This can be useful in viewing events that may be blacked out in some areas. Once the country and city are chosen clicking the “Off” button will connect you there.
- Settings – the gear icon will return you to the settings screen of the regular interface.
- Quick connect – the expansion icon will open the normal quick connect screen.
Using the Simple Interface to Connect to IPVanish
The simple interface is easy to use and takes up very little desktop space on your PC. It can be tucked into a corner of the screen but still available so that a glance is all you need to see the status of your VPN session. It allows you to connect and disconnect with just a single mouse click. Else, choose your country, city, and then connect.
Connecting to IPVanish Using the Quick Connect
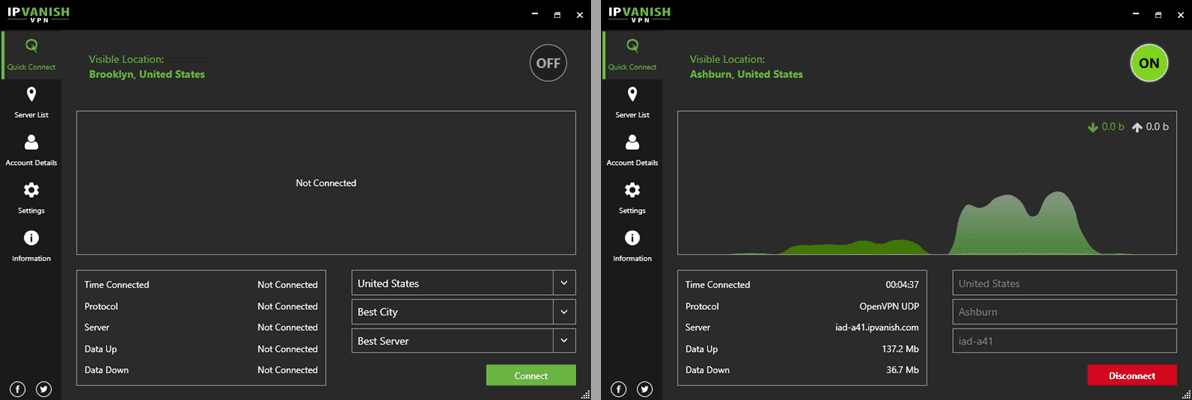
Quick connect is the regular size version of the of the simple mode interface screen. It is just as easy to use as the simple interface but it will allow you to connect all the way down to a specific server n the IPVanish network. Here is a look at the features of the full interface with exploded views of the city (with Ashburn selected) and server shown beside it.
- Current location – the interface shows the current public Internet locations and the IP address associated with it. Once connected this will display your new virtual location and IP address.
- Current status – this displays parameters once connected. These include: time connected, protocol used, server chosen, data uploaded, and the data downloaded.
- Graph – once you join the IPVanish network, this displays a real-time graph of the data downloaded and uploaded.
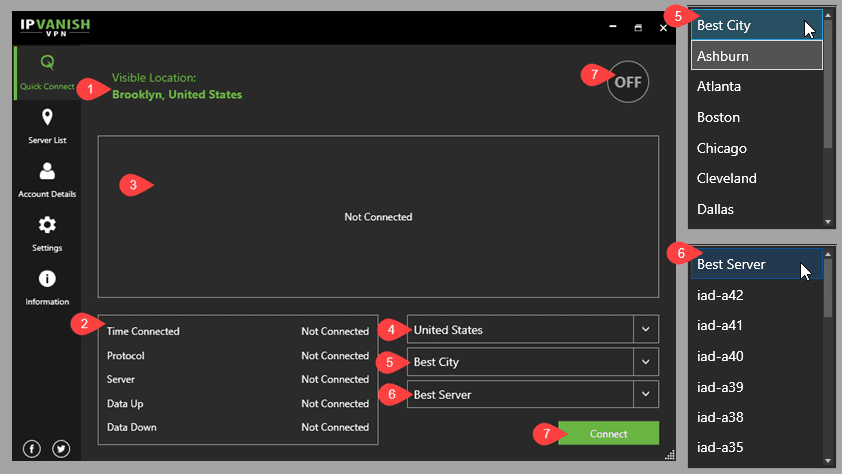
- Select country – by default, this will display your country of origin, but you can change this by clicking on the current country and selecting another one from the resultant dropdown list. Changing your country will also reset the city back to “Best city” and server to “Best server” if they have been changed.
- Select city – this displays the best city in your chosen country to connect to based on ping from your location and server loads by default. Once changed, it will default to your last successful connection. Changing the city will reset the server to “Best server”
- Choose server – by default, this shows the “Best server” in your chosen city or the server of your last successful connection.
- Connection status – selecting either the “Off” or “Connect” button will connect you to the currently chosen location. Once connected the “Off” button will turn green and the green “Connect” button will transform into a red “Disconnect” one.
Connecting to IPVanish Using the Sever List Screen
The server list screen has three tabs. These tabs are “List”, “Map”, and “Filter”. These have different features to allow you to easily determine the fastest server in the region, country, or city for your IPVanish connection.

Server List: List Tab
The Server List: List tab is used to help you find the best server for your connection. The list can be ordered by country, response time (ms), load percentage, or favorites. It has the following features:
- Public (virtual) location – current virtual location and IP address (redacted from image).
- Connection status – the status of the connection.
- Sort by – toggle to sort country-city list by:
- Country – this list is sorted in alphabetical order by country and then city. This is probably the least efficient search type for IPVanish.
- Response time – the list is sorted by increasing server ping time (ms). This search can help you quickly find the server with the fastest response time.
- Load percentage – can help you find low load servers quickly because it orders the list by increasing load percentage.
- Favorites – moves favorite locations to the top of the list. These are followed by the other countries in alphabetical order.
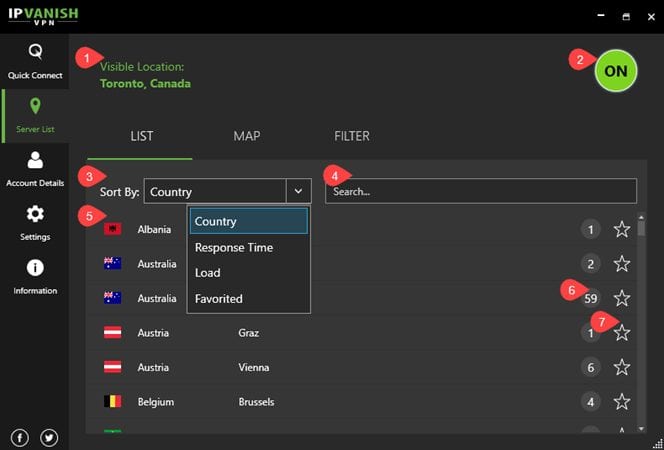
- Responsive search box – is a search that filters the list as letters are added to the search text. This search works with both countries and cities. This search is used to filter the sort results to the location you want to connect to.
- List of countries-cities – these are ordered by the sort criteria.
- Number of servers – total number of servers at that country-city location. Clicking on this will expand that location in the list to server level. Each server shows ping (ms) and load percentage values to help you find the fastest one at that location.
- Favorites – clicking on the star beside a location will create a favorite to the best server at that country-city. You can also select favorites at the server level. The star will turn yellow to indicate that that location or server is a favorite.
Using the Server List to Find Your Fastest Connection
For best results you should use the sort and search features together when connecting using the server list. First, sort the list by response time or load percentage. Then use the search to filter the list to the location you want to connect to. You can then expand the server list and choose the best one yourself or just click the location (country-city) and let IPVanish choose it for you.
Let us take a look at how to find the fastest server to connect to in the United Kingdom using this method. First sort the list by “Response time”. Then type in the search box till United Kingdom results are displayed. After examining the Nottingham location which has the fastest response time (195 ms), we notice that it has a high load percentage (64%). Note that we are testing from the United States so the ping is noticeably slower than it would be if we were connecting to the UK from the region.
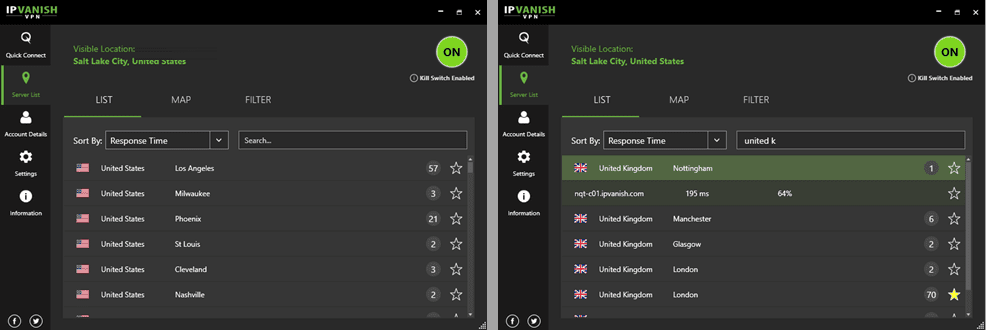
Thus, we will want to check the next location to compare its servers ping times and load values. We notice that server-09 has a 198 ms ping and a 31% load. This is probably the one we would manually select. As a test, we decide to let the IPVanish software choose the server for us by selecting the United Kingdom – Manchester location.
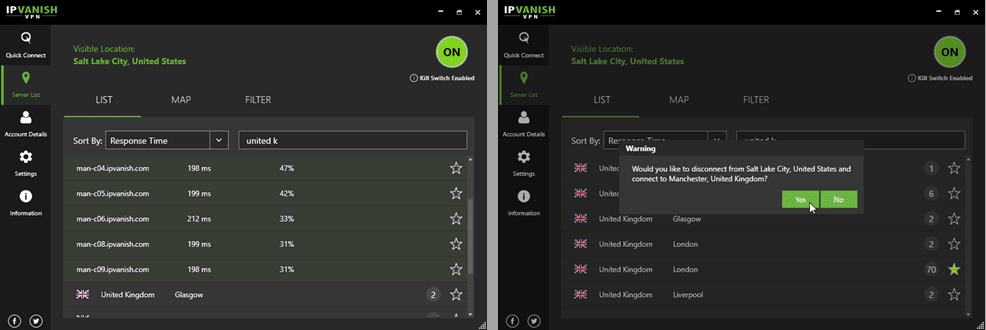
Since we were already connected to a server in the United States, the software prompts us if we want to disconnect from it and reconnect to the one in the United Kingdom. After clicking yes and switching to the quick connect screen, we see that the software chose the same one we would have manually chosen.
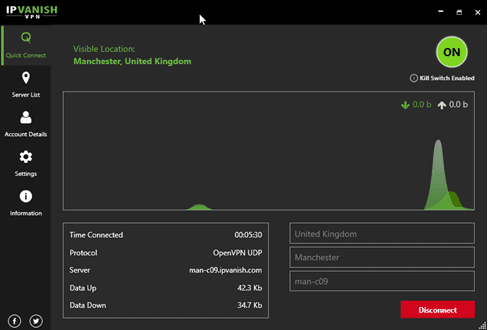
We conducted similar tests for other sorts and searches. In each case the software chose one of the same servers that we would have manually chosen. Therefore, we are confident in letting the client choose the best server once we have selected a location using the list. This will help simplify your server searches when a location has multiple servers. Server locations that you use regularly should be be marked as favorites to make it easier to reconnect to them.
Server List: Map Tab
For those who are more visibly oriented, IPVanish will let you choose your server connection from the map screen. This is easy to do. First select the area (continent or country) that you want to connect to. Mouse over the available destinations to see their ping values. Choose the one with lowest ping and then expand that area to get a more granular choice of servers. Check the new ping values. Click on the one with the lowest value.
Let us look at how to use the map to select the fastest server for our connection. This screen can be scrolled using the mouse or your finger. After checking the server ping values by mousing over the numbers representing them, we found that the fastest server was in the upper northeast region in Boston. To verify this, we scrolled and zoomed (using the mouse wheel but the map also works with touchscreen gestures) into that region and examined the server pings in that area at Montreal, Toronto, New York, and Boston.
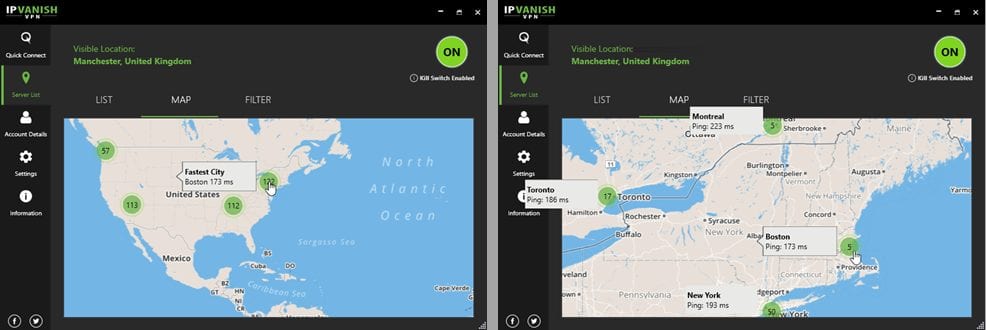
Clicking on the location for Boston brings up the prompt to connect since we are currently connected to the server in Manchester. Clicking “Yes” completes the connection to the best server in Boston. If we had not been connected to the IPVanish network, clicking on the Boston location would have connected us directly to the best server there.
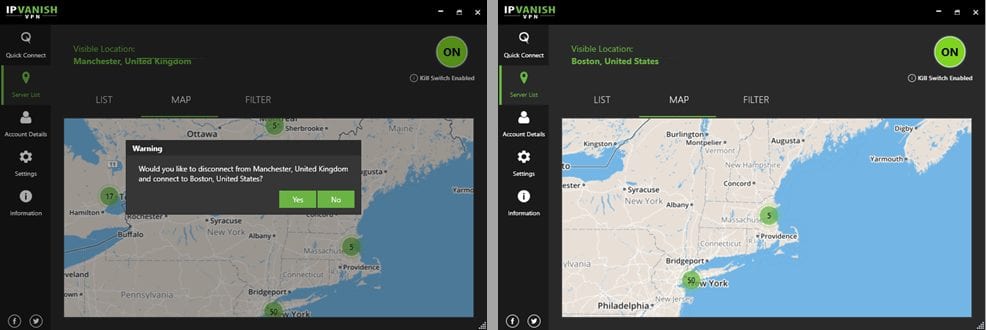
As you can see, using the map screen to connect to a server location takes just a single click once you have zoomed into your target. Choosing a new destination and reconnecting to a server is just as easy. Simply move to the part of the world that you want to connect to, zoom in if necessary, and click on your new location.
Server List: Filter Tab
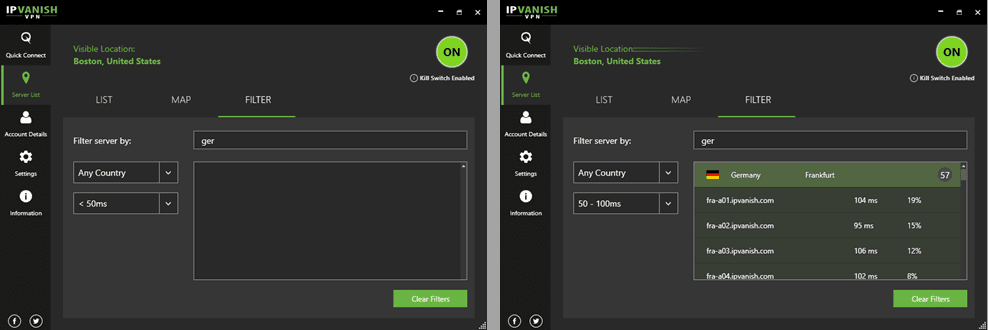
The filter tab is similar to the list tab in features. However, it can only be filtered by country or a latency range. It also has a button to clear the current filters. This makes it ideal to find out what the lowest latency for a particular country may be. Here is the default filter screen with the country and latency filters shown in exploded view beside it.
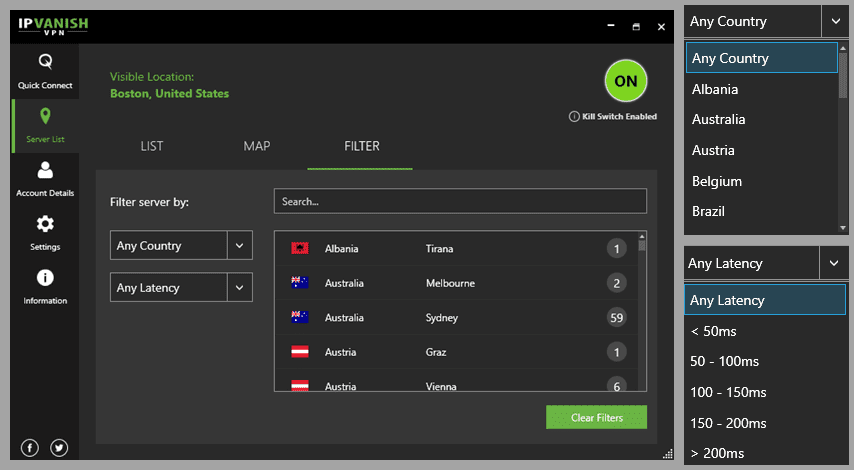
Determine Ping Range of Locations
The best way to use this screen is to search for a particular country or city and then check for a latency range. If none is found, then you should increase the range till one is found. This will help you get an idea of the speed of your connection from that country. The filter can also be used to find servers in countries around you that have the lowest latency.
For instance we wanted to test the best connection from our location to Germany so we can find a server for streaming media. First, make sure to clear filters by clicking the “Clear filters” button. Next, begin typing, ger, (case does not matter) in the search bar. Once Germany is at the top of the filtered list, select <50 ms latency range. If no servers are found, clear the filters and increase the latency to the next range. Once Germany reappears in the list, you have determined where the fastest VPN servers in Germany are. In our case, the servers in Frankfurt were fastest at approximately 100 ms. That’s great considering we’re 4,500 miles away.
The Windows client makes it easy for everyone to connect to the IPVanish network. It has a simple mode that takes up less computer real estate and allows you to connect and disconnect in just a couple of clicks by accepting the software defaults. It will also let you choose a country-city location to connect to for streaming or other purposes. This is ideal for those who do not want to be bothered by the technical details of using IPVanish but want the security that it provides.
At the same time it has a normal interface that gives you greater control over the client behavior and protocols for those who crave a more hands-on technical approach to their VPN connections. It will let you control DNS queries and leaks. You can activate the IPVanish kill switch and control how LAN traffic is treated when the switch is activated.
This lets you determine how the app behaves during startup and shutdown. You can use the quick connect feature or manually drill down to examine the ping and load percentage of servers in the country or city for your connection. Once you find the servers that are fastest for your day-to-day online activities, you can save them as favorites. In short, IPVanish will let you decide the level of control you want over your VPN connection.

